How To Use Gpu In Jupyter Notebook – Your’s Ultimate Guide!
I supercharged my data science projects by using GPUs in Jupyter Notebook. By following a few simple steps to configure CUDA and cuDNN, I cut my model training time dramatically. Learn how you can replicate my success and enhance your workflows with GPU acceleration.
To use a GPU in Jupyter Notebook, install Anaconda and set up a Conda environment with TensorFlow or PyTorch for GPU support. Then, configure CUDA Toolkit and cuDNN for compatibility. Start Jupyter Notebook and select the GPU-enabled kernel to accelerate your computations.
Introduction To Use Gpu In Jupyter Notebook
The supercharge your data science work, learning how to use GPU in Jupyter Notebook is a game-changer. GPUs, or Graphics Processing Units, offer significant computational power that can accelerate your machine learning models and data processing tasks.
To get started with using a GPU in Jupyter Notebook, you’ll first need to ensure that your system is properly set up. This involves installing Anaconda, which simplifies managing your Python environment and packages. Next, you’ll install the CUDA Toolkit and cuDNN library, essential tools that enable your GPU to communicate effectively with your code.
By creating a dedicated Conda environment and installing the necessary GPU-compatible libraries like TensorFlow or PyTorch, you prepare your Jupyter Notebook to leverage GPU capabilities. Finally, you’ll configure your Jupyter Notebook to recognize and utilize the GPU, ensuring that your computations run faster and more efficiently. Learning how to use GPU in Jupyter Notebook not only boosts performance but also enhances your ability to work with larger datasets and more complex models.
Step-by-Step Running Jupyter Notebook on GPUs
1. Install Anaconda:
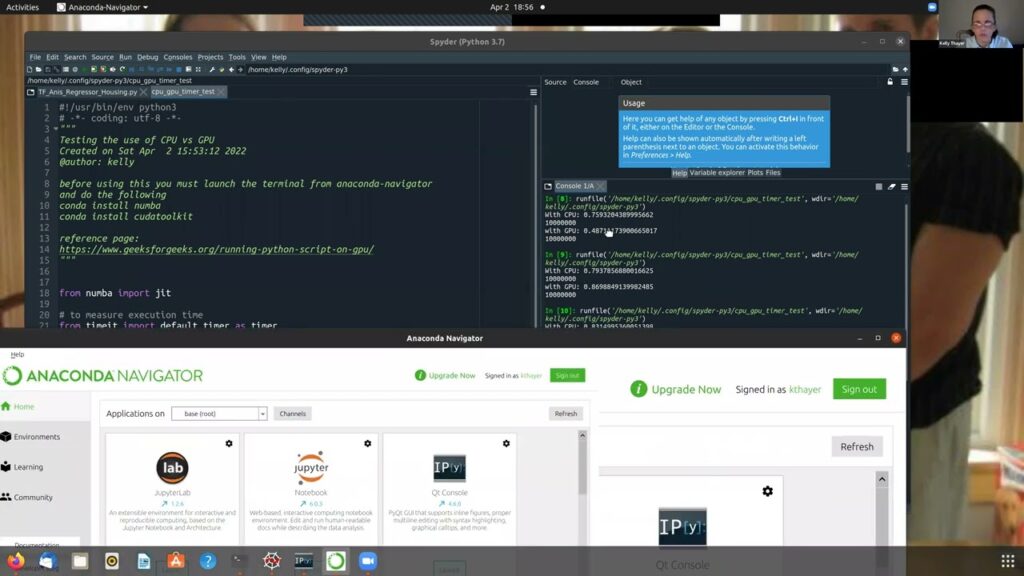
To get started with using GPU in Jupyter Notebook, the first step is to install Anaconda. Anaconda is a free and powerful distribution of Python and its libraries, designed to simplify package management and deployment. It comes with Jupyter Notebook pre-installed, which makes it easier to manage your data science projects.
To install Anaconda, visit the official Anaconda website and download the installer that matches your operating system.Once Anaconda is installed, you can launch Jupyter Notebook directly from the Anaconda Navigator or via the command line.
2. Install CUDA Toolkit:
To effectively use a GPU in Jupyter Notebook, the first crucial step is to install the CUDA Toolkit. CUDA, which stands for Compute Unified Device Architecture, is developed by NVIDIA and is essential for harnessing the power of your GPU for general-purpose computing tasks. To get started, visit NVIDIA’s official CUDA Toolkit download page. Make sure to choose the version compatible with your GPU and operating system.
Also Read: Is Zotac a Good GPU Brand – A Comprehensive Review!
3. Install cuDNN Library:
- Download cuDNN: Go to the NVIDIA cuDNN download page to get the library needed for GPU acceleration. Ensure you select the version that matches your CUDA Toolkit for smooth integration.
- Extract and Install: After downloading, extract the files and follow the installation instructions. This process enables you to optimize deep learning models in Jupyter Notebook, leveraging the full power of your GPU.
- Configure Path: Update your system’s environment variables to include cuDNN paths. This step ensures that Jupyter Notebook can properly access cuDNN libraries when you’re using GPU for computations.
4. Create a Conda Environment:
- Create Environment: To manage dependencies and avoid conflicts, use Conda to create a new environment. This isolates your Jupyter Notebook setup, making it easier to use GPU resources. Run the command: conda create –name gpu_env python=3.8, replacing gpu_env with your preferred name.
- Activate Environment: Once created, activate the environment with conda activate gpu_env. This ensures that any packages or configurations you install will be specific to this environment, streamlining the process of setting up GPU support in Jupyter Notebook.
- Install Packages: With the environment active, install necessary GPU-compatible libraries, such as TensorFlow and Keras, using commands like conda install -c anaconda tensorflow-gpu keras-gpu. This prepares your environment for efficient GPU usage in Jupyter Notebook.
5. Configure Jupyter Notebook for GPU:
To configure Jupyter Notebook for GPU, you need to create a new kernel that allows Jupyter to leverage GPU resources effectively. First, with your Conda environment activated, run the command python -m ipykernel install –user –name gpu_env –display-name “Python (GPU)”.
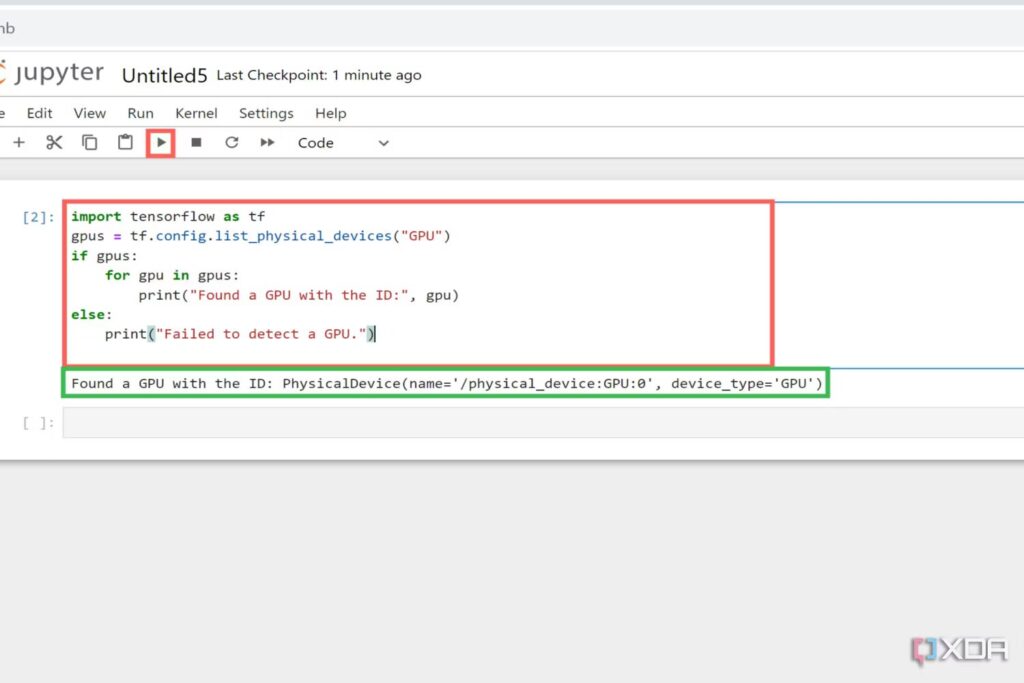
This command sets up a kernel named “Python (GPU)” that links to your GPU-enabled Conda environment. By selecting this kernel in Jupyter Notebook, you ensure that your code will utilize the GPU for faster computations. This setup is crucial for optimizing how to use GPU in Jupyter Notebook and ensuring that your machine learning models and data processing tasks benefit from the enhanced performance of GPU acceleration.
6. Verify GPU Utilization in Jupyter Notebook:
To verify GPU utilization in Jupyter Notebook, follow these simple steps. Start by importing PyTorch with import torch and then run torch.cuda.is_available(). If the output is True, it confirms that your GPU is available and recognized by Jupyter Notebook.
For more detailed information on GPU usage, you can use torch.cuda.get_device_name(0) to check the name of the GPU and torch.cuda.memory_allocated() to see how much memory is being used. This process ensures that you’re effectively leveraging GPU resources for your computations, crucial for optimizing how to use GPU in Jupyter Notebook.
Pros and Cons of GPU Acceleration in Jupyter Notebook
Using a GPU in Jupyter Notebook can significantly enhance your data science and machine learning workflows. One of the primary benefits of GPU acceleration in Jupyter Notebook is the considerable speedup in model training and computation.
By leveraging the parallel processing capabilities of GPUs, you can execute complex operations much faster than with a CPU alone, which is particularly beneficial for large-scale data processing and deep learning tasks. This acceleration allows you to handle larger datasets and more intricate models, leading to more efficient experiments and quicker results.
However, there are some drawbacks to consider when using GPUs in Jupyter Notebook. For instance, GPUs can consume more power compared to CPUs, which may lead to higher operational costs and increased energy consumption. Additionally, compatibility issues can arise if your GPU model is not supported by the libraries or frameworks you are using in Jupyter Notebook.
Limited GPU memory can also be a constraint, especially when dealing with extremely large models or datasets, potentially leading to out-of-memory errors. Despite these challenges, the benefits of GPU acceleration in Jupyter Notebook often outweigh the downsides, making it a valuable tool for those seeking faster and more efficient computational capabilities.
Also Read: Is Rust CPU or GPU Heavy – Discover the Truth in 2024!
Troubleshooting Common GPU Issues
When using GPU in Jupyter Notebook, you might encounter some common issues that can hinder your workflow. One frequent problem is the CUDA out-of-memory error, which occurs when your GPU runs out of memory during computations.
To resolve this, you can try reducing the batch size of your data, optimizing your model to use less memory, or utilizing mixed-precision training to lessen memory demands. Another issue could be an incompatible CUDA version, which happens when your CUDA toolkit doesn’t align with the version of PyTorch or TensorFlow you’re using.

Ensure compatibility by checking the documentation for both CUDA and your deep learning frameworks, and update as necessary. Efficient data movement between CPU and GPU is crucial; use PyTorch’s to() or cuda() methods properly to transfer data smoothly. By addressing these common problems, you can effectively use GPU in Jupyter Notebook, boosting your computational efficiency and performance.
FAQ’s
1.Can I use multiple GPUs with Jupyter Notebook?
Yes, you can use multiple GPUs by configuring your deep learning framework to utilize multiple devices. For instance, in PyTorch, you can use torch.nn.DataParallel or torch.distributed to leverage multiple GPUs.
2. What should I do if Jupyter Notebook is not detecting my GPU?
If Jupyter Notebook is not detecting your GPU, ensure that your GPU drivers and CUDA Toolkit are correctly installed and compatible with your deep learning framework. Verify your setup by running the nvidia-smi command in the terminal to check GPU status.
3. What should I do if I encounter a CUDA out-of-memory error?
If you encounter a CUDA out-of-memory error, you can try reducing your batch size, optimizing your model architecture, or using mixed-precision training. Also, ensure that no other processes are using the GPU memory.
4. How can I resolve compatibility issues between CUDA and my deep learning framework?
To resolve compatibility issues, ensure that the CUDA version you have installed matches the version required by your deep learning framework (e.g., TensorFlow or PyTorch). You may need to upgrade or downgrade your CUDA toolkit or the framework accordingly.
5. What are the common issues with CUDA and how can I fix them?
Common CUDA issues include out-of-memory errors and compatibility problems. To address these, you can reduce batch sizes, optimize model architecture, or ensure that your CUDA version matches your deep learning framework’s requirements.
Conclusion:
“How To Use In Jupyter Notebook”Using GPUs in Jupyter Notebook can significantly eGpu nhance the performance of your data science and machine learning projects. By following the steps outlined—installing CUDA Toolkit, setting up the cuDNN library, creating a Conda environment, and troubleshooting common issues—you can leverage the power of GPUs to accelerate computations and handle larger datasets more efficiently.
Read More:



Post Comment